Tutorial: Create a Radius Application
Categories:
Overview
This tutorial will teach you the basics of creating a new Radius Application. You will learn how to:
- Define and deploy a Radius Environment and Application
- Add a container to your application and customize that container
- Add a MongoDB database to your application and connect it to your container
- Add a second container and connect it to the first container
- Expose your application through a Gateway
By the end of the tutorial, you will have created and deployed a new Radius Application.
Prerequisites
Step 1: Install Radius with a default Environment and Workspace
This tutorial will use the rad init command to install Radius on a Kubernetes cluster and initialize the configuration with an Environment called default and Recipes for deploying to Kubernetes. Future tutorials will demonstrate using Recipes for deploying to AWS and Azure.
-
Create a new directory for the Todo List application.
mkdir todolist cd todolist -
Install Radius.
rad initWhen asked if you want to create a new application select Yes. This will create a new file named
app.bicepin your working directory where. It will also create abicepconfig.jsonfile that will contain the necessary configuration to use Radius core resource types.
Step 2: Explore the default configuration
Inspect the Workspace created by rad init.
-
List the available Workspaces using
rad workspace listrad workspace list$ rad workspace list WORKSPACE KIND KUBECONTEXT ENVIRONMENT default kubernetes my-kube-context defaultShow the current Workspace. The
--output jsonwill show all the details of the Workspace.rad workspace show -o json$ rad workspace show -o json { "connection": { "context": "my-kube-context", "kind": "kubernetes" }, "environment": "/planes/radius/local/resourceGroups/default/providers/Applications.Core/environments/default", "scope": "/planes/radius/local/resourceGroups/default" }Notice that a Radius Workspace is a combination of a Kubernetes context, a Radius Environment, and a Resource Group.
💡 Workspaces
Workspaces are configurations set for the Radius CLI. Similar to kubectl contexts, you can have multiple Workspaces pointing to different Radius installation, Resource Groups, and Environments. -
List the resource groups created by
rad initusing therad group listcommand.rad group list$ rad group list GROUP ID default /planes/radius/local/resourcegroups/defaultrad initcreates a group calleddefault.💡 Resource Groups
Every resource deployed in Radius belongs to one and only resource group. And each resource in a group must have a unique name. This includes environments and applications which are modeled as resources in Radius. -
Inspect the Environment using the
rad environment listandrad environment showcommands.rad environment list$ rad environment list RESOURCE TYPE GROUP STATE default Applications.Core/environments default Succeededrad environment show default --output json$ rad environment show default --output json { "id": "/planes/radius/local/resourcegroups/default/providers/Applications.Core/environments/default", "location": "global", "name": "default", "properties": { "compute": { "kind": "kubernetes", "namespace": "default" }, "provisioningState": "Succeeded", "recipes": { ... } }, ... "type": "Applications.Core/environments" }💡 Development Environments
By defaultrad initgets you up and running with a local, development-focused environment where most of the environment configuration is handled for you, including Recipes (more on that soon). If you would like to fully customize your environment, you can runrad init --full
Step 3: Deploy the Todo List application
The app.bicep file defines all the resources (Containers, Gateways, cloud services, etc.) that make up the Todo List application, including how those resources are connected to each other.
-
Open
app.bicepand review the application definition created byrad init. The Todo List application definition includes:extension radiusThe
extensionstatement imports the resource types built into Radius.@description('The ID of your Radius Application. Set automatically by the rad CLI.') param application stringThe
applicationparameter is defined so it can be used later in the resources. This parameter is set by the Radius CLI when deploying the application.resource demo 'Applications.Core/containers@2023-10-01-preview' = { name: 'demo' properties: { application: application container: { image: 'ghcr.io/radius-project/samples/demo:latest' ports: { web: { containerPort: 3000 } } } } }The initial version of the application only has a single container named demo.
-
Deploy Todo List application using the
rad deploycommand.rad deploy app.bicep$ rad deploy app.bicep Building app.bicep... WARNING: The following experimental Bicep features have been enabled: Extensibility. Experimental features should be enabled for testing purposes only, as there are no guarantees about the quality or stability of these features. Do not enable these settings for any production usage, or your production environment may be subject to breaking. Deploying template 'app.bicep' for application 'todolist' and environment '/planes/radius/local/resourceGroups/default/providers/Applications.Core/environments/default' from workspace 'default'... Deployment In Progress... Completes demo Applications.Core/containers Deployment Complete Resources: demo Applications.Core/containers -
Run
rad app graphcommand to print the application resources and relationships:rad app graphYou should see the container you just deployed, along with the underlying Kubernetes resources that were created to run it:
$ rad app graph
Displaying application: myapp

Name: demo (Applications.Core/containers)
Connections: (none)
Resources:
  demo (kubernetes: apps/Deployment)
  demo (kubernetes: core/Service)
  demo (kubernetes: core/ServiceAccount)
  demo (kubernetes: rbac.authorization.k8s.io/Role)
  demo (kubernetes: rbac.authorization.k8s.io/RoleBinding)
Step 4: Connect to the Todo List application
The rad deploy command simply deployed the application to the Kubernetes cluster but does not configure network access via an ingress controller or load balancer. In order to access the application, you must either setup Kubernetes port forwarding, or simply use the rad run command which sets up port forwarding and log streaming.
rad run app.bicep
You should see the container deployed and the port forward and log stream started:
$ rad run app.bicep
Building app.bicep...
WARNING: The following experimental Bicep features have been enabled: Extensibility. Experimental features should be enabled for testing purposes only, as there are no guarantees about the quality or stability of these features. Do not enable these settings for any production usage, or your production environment may be subject to breaking.
Deploying template 'app.bicep' for application 'todolist' and environment '/planes/radius/local/resourceGroups/default/providers/Applications.Core/environments/default' from workspace 'default'...

Deployment In Progress...

Completes           demo            Applications.Core/containers

Deployment Complete

Resources:
    demo            Applications.Core/containers

Starting log stream...

+ demo-5bc9b77586-cf95n › demo
demo-5bc9b77586-cf95n demo No APPLICATIONINSIGHTS_CONNECTION_STRING found, skipping Azure Monitor setup
demo-5bc9b77586-cf95n demo Using in-memory store: no connection string found
demo-5bc9b77586-cf95n demo Server is running at http://localhost:3000
dashboard-5965dd78b9-xt2k6 dashboard [port-forward] connected from localhost:7007 -> ::7007
demo-5bc9b77586-cf95n demo [port-forward] connected from localhost:3000 -> ::3000
Open http://localhost:3000 to view the Radius demo container.

When you’re done press CTRL + c to terminate the port forward and log stream. The application continues to be deployed.
Step 5: Add a database and a connection
Add a database to the Todo List application so that the todo items are persisted. Radius ships with a built-in MongoDB resource type.
-
Add a MongoDB database and an environment parameter to your
app.bicepfile:@description('The ID of your Radius Environment. Set automatically by the rad CLI.') param environment string resource mongodb 'Applications.Datastores/mongoDatabases@2023-10-01-preview' = { name: 'mongodb' properties: { environment: environment application: application } }💡 Radius Recipes
Note that when you added the MongoDB database to your application you didn’t need to specify how or where to run the underlying infrastructure. The Radius Environment and its Recipes take care of that for you. Just like how the Radius Environment bound your container to a Kubernetes cluster, it also deploys and binds your MongoDB database to underlying infrastructure using Recipes. -
To learn about the underlying Recipe that will deploy and manage the Mongo infrastructure run
rad recipe show:rad recipe show default --resource-type Applications.Datastores/mongoDatabasesYou’ll see details on the Recipe, including available parameters and defaults:
$ rad recipe show default --resource-type Applications.Datastores/mongoDatabases
NAME      TYPE                                    TEMPLATE KIND  TEMPLATE VERSION  TEMPLATE
default   Applications.Datastores/mongoDatabases  bicep                            ghcr.io/radius-project/recipes/local-dev/mongodatabases:latest

PARAMETER NAME  TYPE          DEFAULT VALUE   MIN       MAX
username        string        admin           -         -
password        secureString  Password1234==  -         -
database        string                        -         -
You can view the Bicep template used as the Recipe in the Recipes GitHub repository.
-
Add a connection from your container to the MongoDB database, which indicates to Radius that your container needs to communicate with the database:
resource demo 'Applications.Core/containers@2023-10-01-preview' = {
  name: 'demo'
  properties: {
    application: application
    container: {
      image: 'ghcr.io/radius-project/samples/tutorial/demo:edge'
      ports: {
        web: {
          containerPort: 3000
        }
      }
    }
    connections: {
      mongodb: {
        source: mongodb.id
      }
    }
  }
}
💡 Radius Connections
Radius Connections are more than just bookkeeping. They are used to automatically configure access for your containers. Learn more in the containers documentation. -
Re-run your app using
rad runto deploy the MongoDB database and container and start the port forward and log stream:rad run app.bicep -
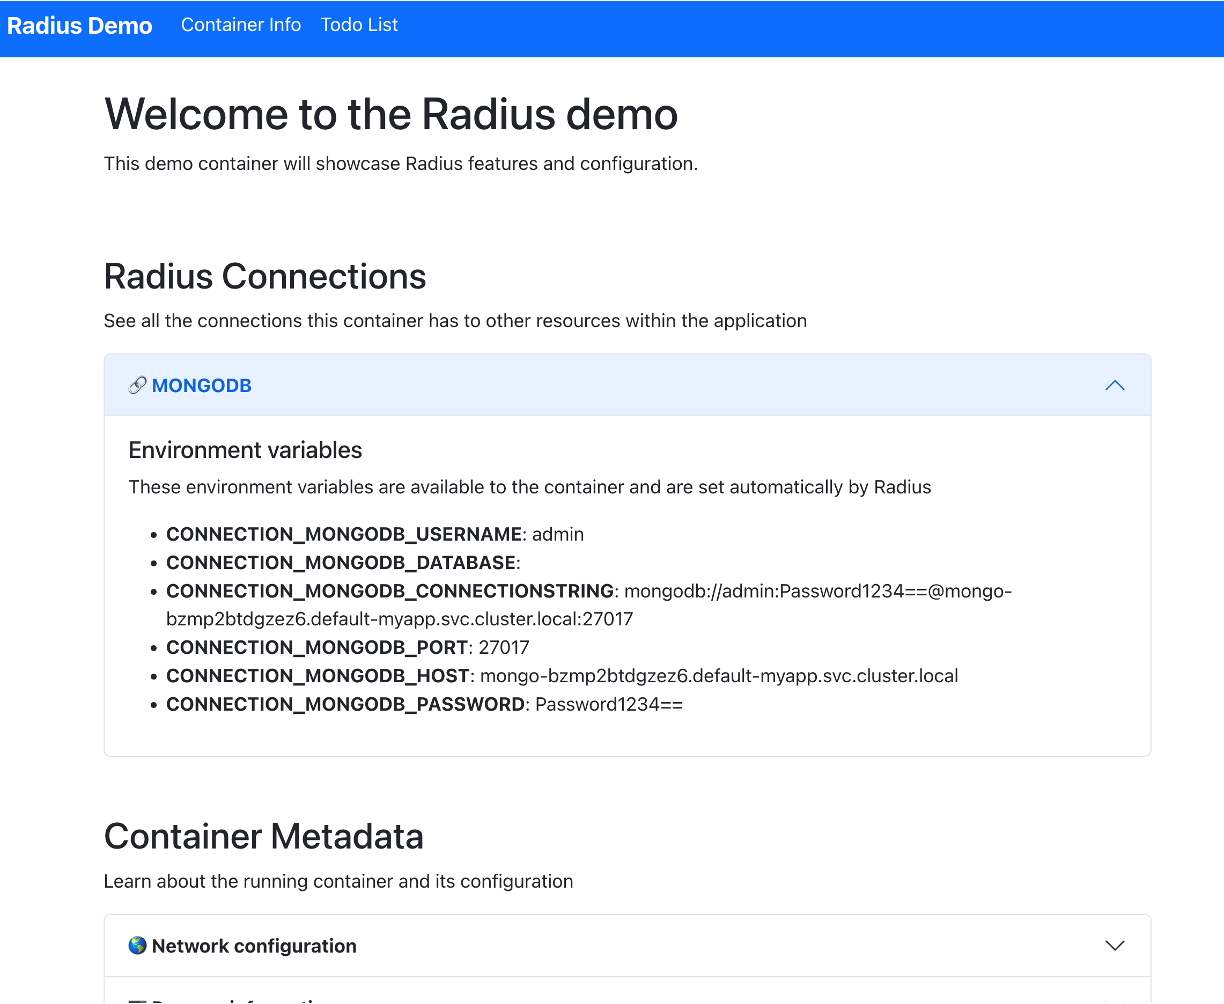
Open localhost:3000 to interact with the demo container. You should see the container’s connections and metadata, this time with a connection to the Mongo database and new environment variables set.
-
Press
CTRL + cto terminate the port forward and log stream. -
Run
rad app graphagain to see the new resource.rad app graphYou should see the container and MongoDB database you just deployed, along with the underlying Kubernetes resources that were created:
$ rad app graph
rad app graph
Displaying application: todolist

Name: demo (Applications.Core/containers)
Connections:
  demo -> mongodb (Applications.Datastores/mongoDatabases)
Resources:
  demo (apps/Deployment)
  demo (core/Secret)
  demo (core/Service)
  demo (core/ServiceAccount)
  demo (rbac.authorization.k8s.io/Role)
  demo (rbac.authorization.k8s.io/RoleBinding)

Name: mongodb (Applications.Datastores/mongoDatabases)
Connections:
  demo (Applications.Core/containers) -> mongodb
Resources:
  mongo-bzmp2btdgzez6 (apps/Deployment)
  mongo-bzmp2btdgzez6 (core/Service)
Step 6: Add a backend container
In addition to dependencies, you can add more containers to make your application code more modular. Containers can be configured to interact with each other as needed.
-
Add a second container named
backendto yourapp.bicepfile, specifying the image and port to open to other containers:resource backend 'Applications.Core/containers@2023-10-01-preview' = { name: 'backend' properties: { application: application container: { image: 'nginx:latest' ports: { api: { containerPort: 80 } } } } } -
Add a new connection from your
democontainer to thebackendcontainer:resource demo 'Applications.Core/containers@2023-10-01-preview' = { name: 'demo' properties: { application: application container: { image: 'ghcr.io/radius-project/samples/tutorial/demo:edge' ports: { web: { containerPort: 3000 } } } connections: { mongodb: { source: mongodb.id } backend: { source: 'http://backend:80' } } } } -
Re-run your app with
rad run:rad run app.bicep -
Open localhost:3000 to interact with the demo container. You should see the container’s connections and metadata, this time with a connection to the backend container and new environment variables set:

Note the environment variables that are set with connection information for the backend container.
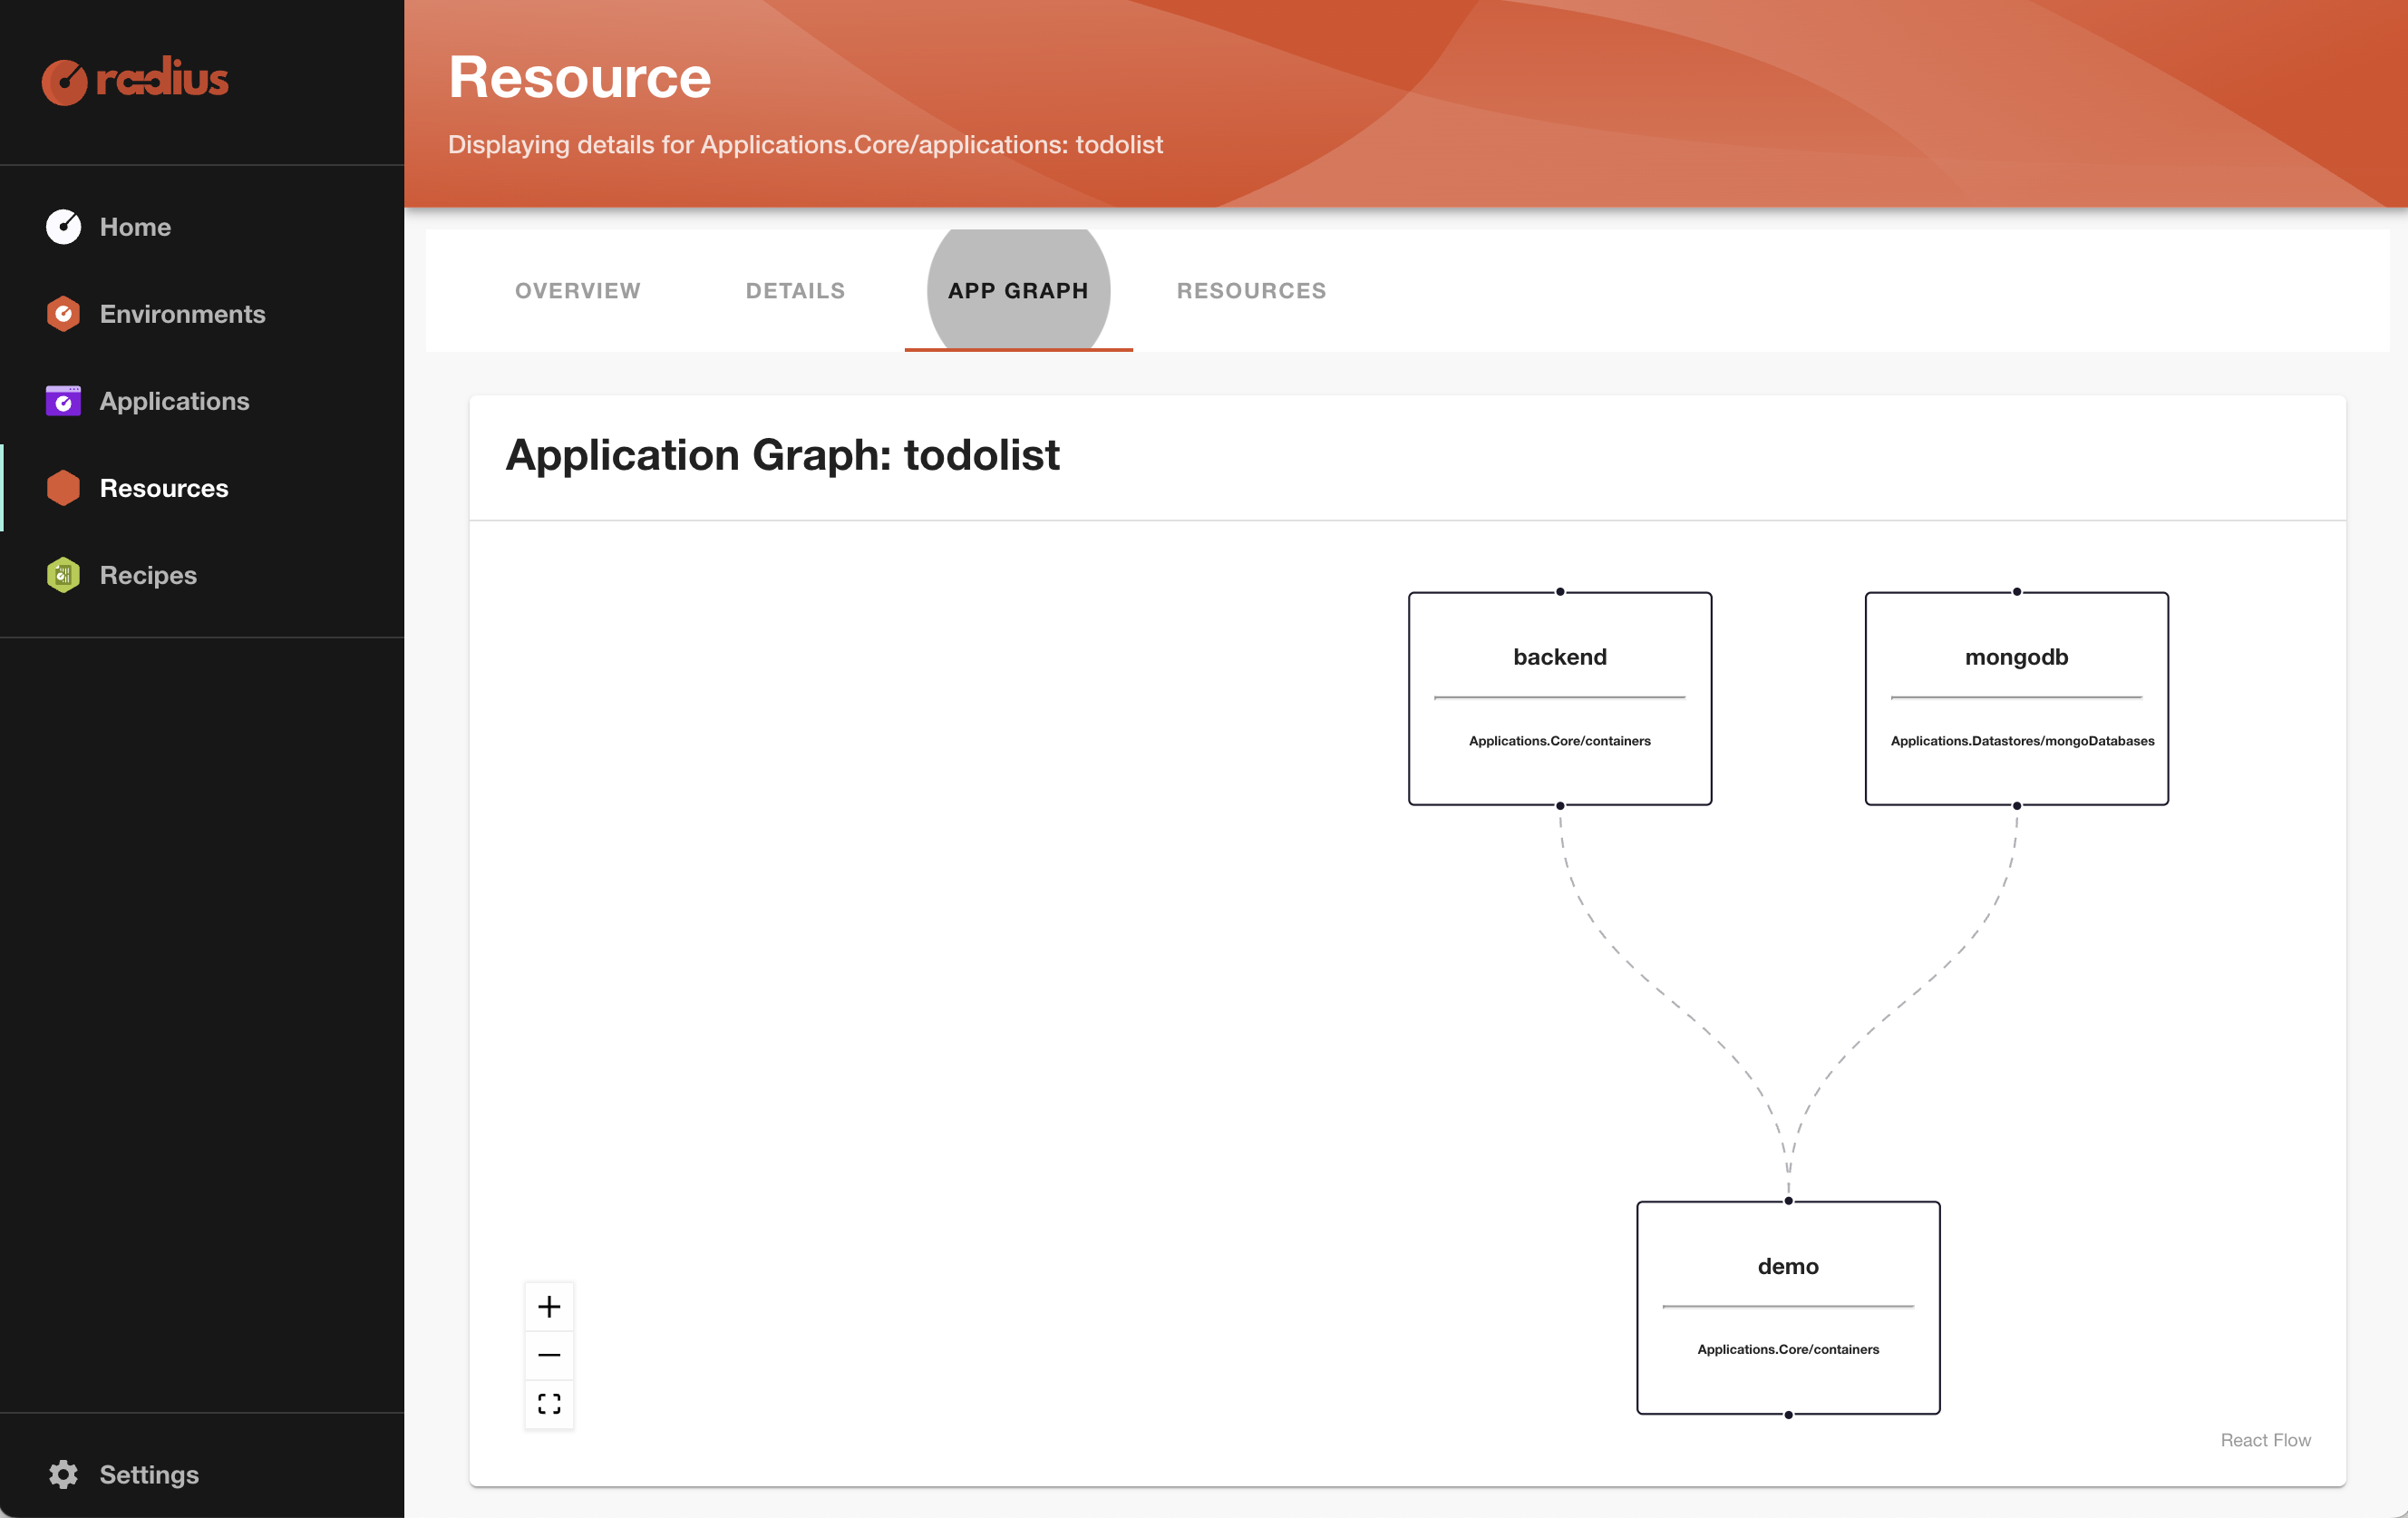
Step 7: View the application graph in the Radius Dashboard
Navigate to the Radius Dashboard at http://localhost:7007, You should see a visualization of the application graph for the application, including the connection from the demo container to mongodb and backend.
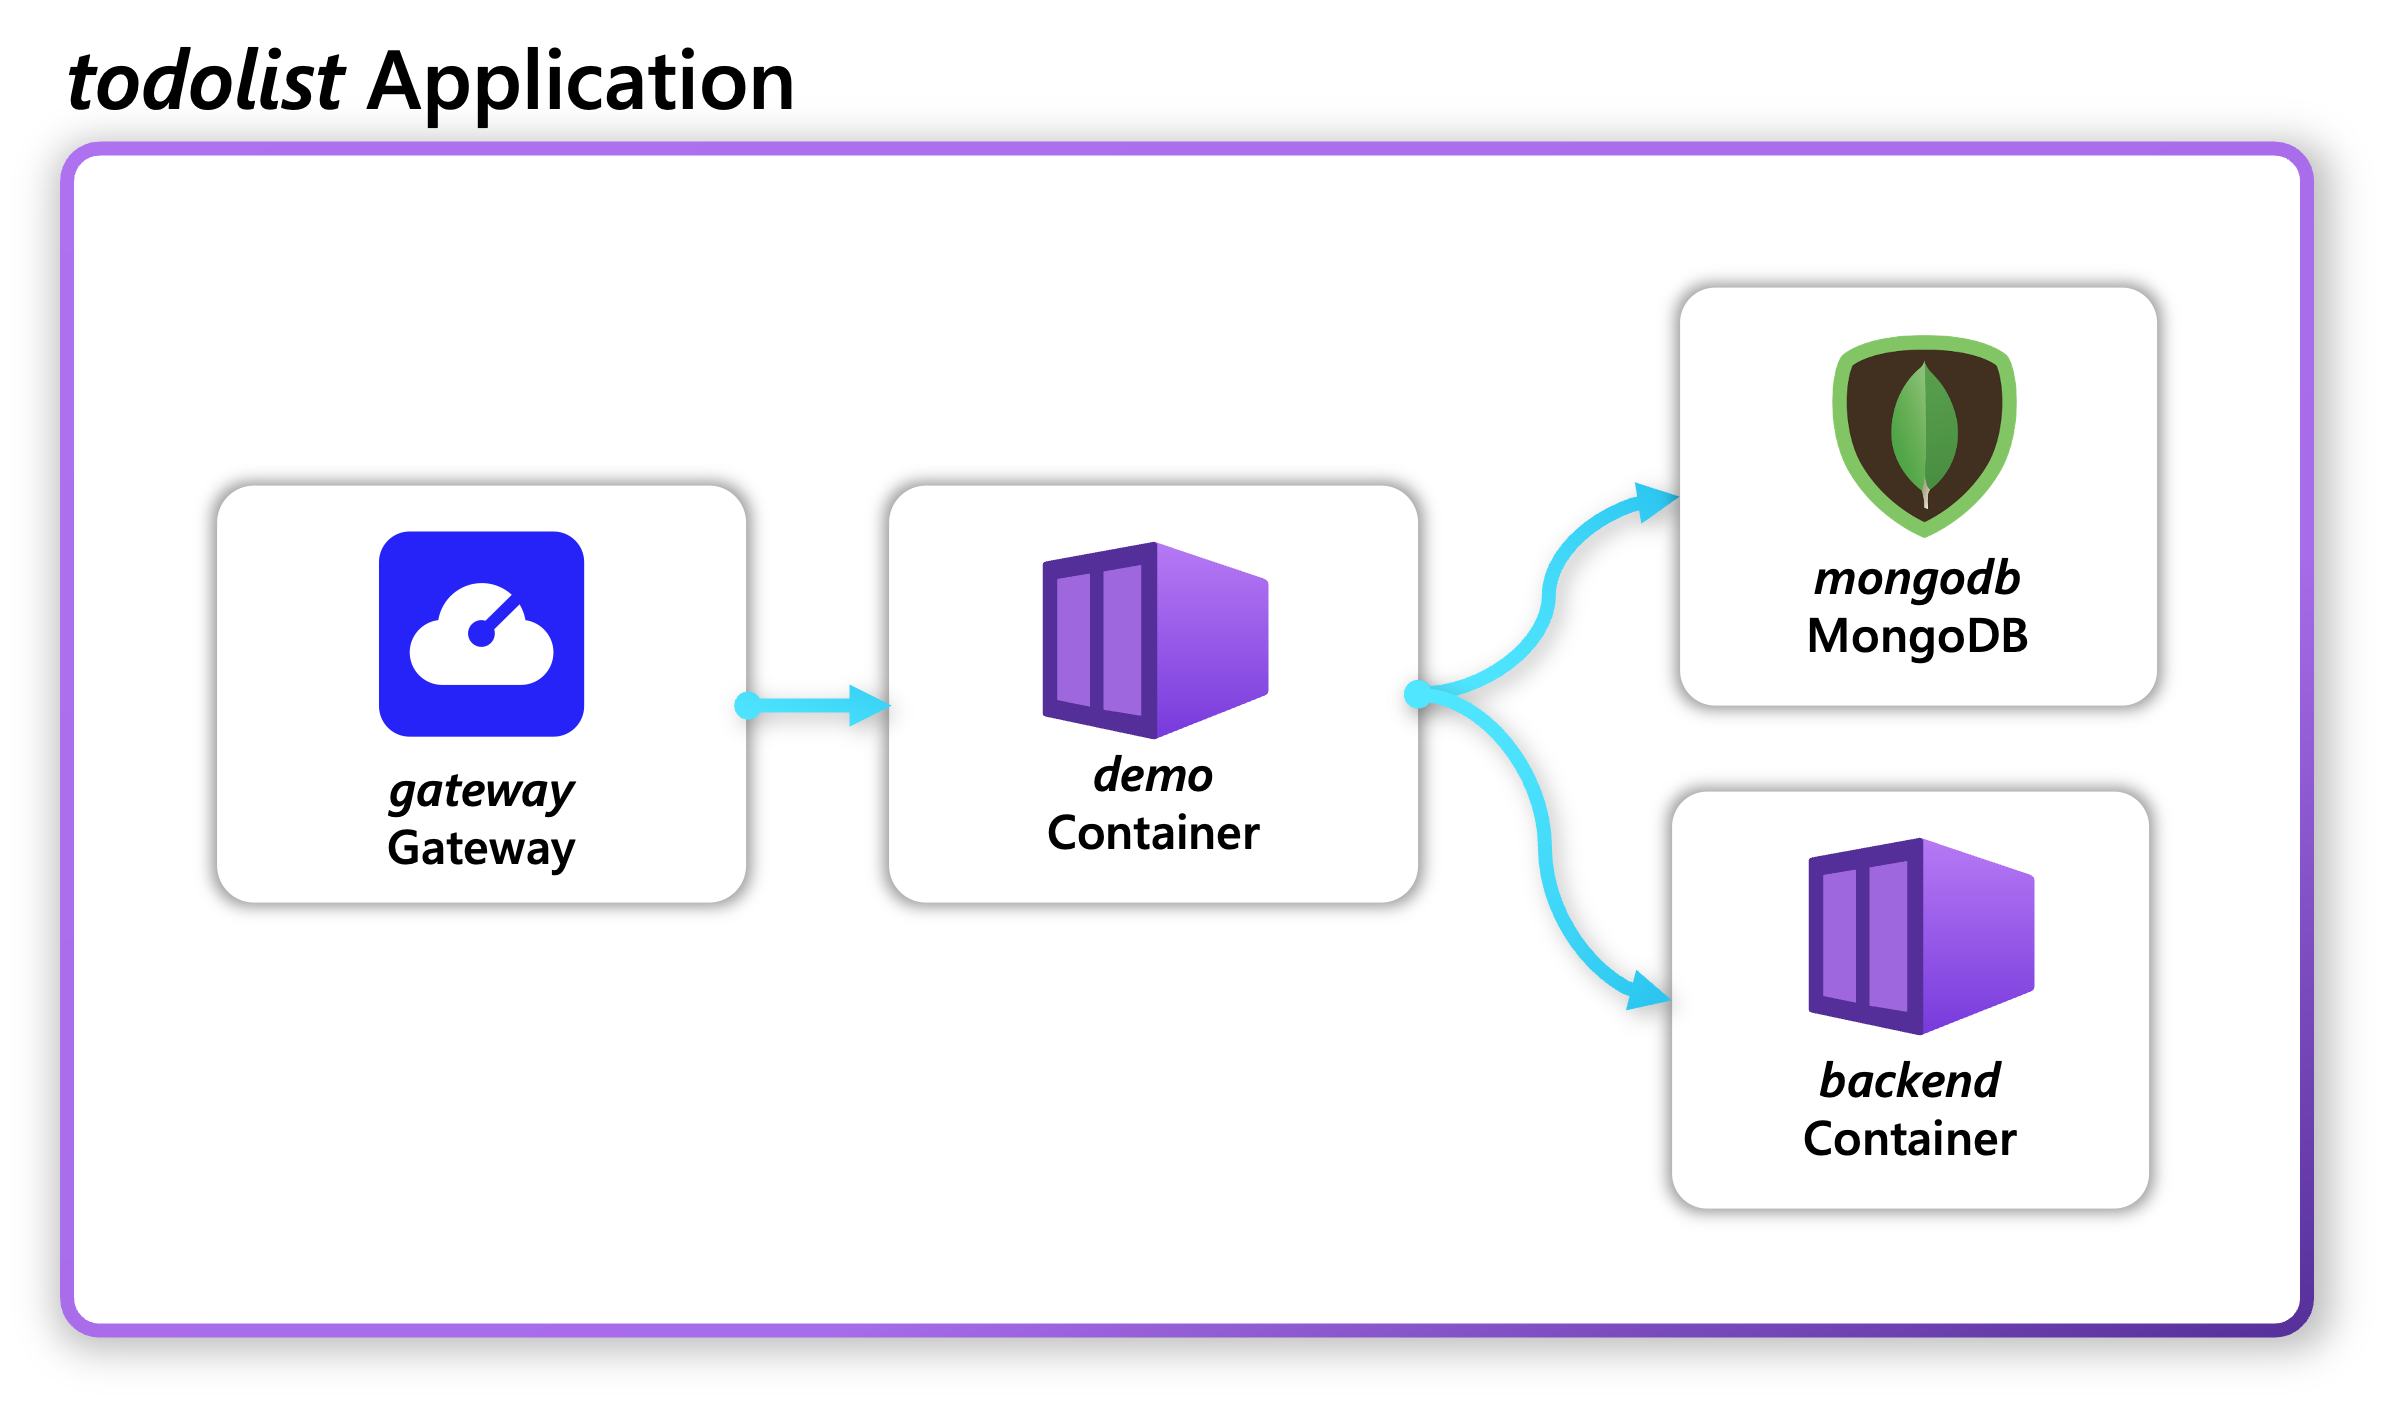
Step 8: Add a Gateway
Finally, add a Gateway to your application to expose the application so that it is accessible from outside the cluster.
-
Add a gateway to your
app.bicepfile:resource gateway 'Applications.Core/gateways@2023-10-01-preview' = { name: 'gateway' properties: { application: application routes: [ { path: '/' destination: 'http://demo:3000' } ] } } -
Deploy your app with
rad deploy:rad deploy app.bicepBuilding app.bicep... Deploying template 'app.bicep' for application 'todolist' and environment '/planes/radius/local/resourceGroups/default/providers/Applications.Core/environments/default' from workspace 'default'... Deployment In Progress... Completed mongodb Applications.Datastores/mongoDatabases Completed backend Applications.Core/containers Completed gateway Applications.Core/gateways Completed demo Applications.Core/containers Deployment Complete Resources: backend Applications.Core/containers demo Applications.Core/containers gateway Applications.Core/gateways mongodb Applications.Datastores/mongoDatabases Public Endpoints: gateway Applications.Core/gateways http://gateway.todolist.172.18.0.6.nip.io -
Open the gateway resource’s URL in your browser. Unlike before, you are connecting to the Gateway instead of directly to the container. You will see the same container connections and metadata as before.
Warning
The application will only be accessible if the Kubernetes cluster you are using has a load balancer controller. If you are using AKS or EKS, the controller is enabled by default. If you are using a local Kubernetes cluster such as kind or k3d, you will need to configure a load balancer controller. See this tutorial for k3d and this for kind.
Feedback
Was this page helpful?
Glad to hear it! Please feel free to star our repo and join our Discord server to stay up to date with the project.
Sorry to hear that. If you would like to also contribute a suggestion visit and tell us how we can improve.