Model, visualize, and deploy applications with Radius Canvas
The Radius Canvas preview supports containerized applications deployed to Azure. Support for AWS is coming soon.
Prerequisites
Before you begin, you need:
The latest version of the GitHub Copilot app.
An Azure subscription. If you don’t have one, create one for free.
The Kubernetes command-line tool (
kubectl), installed and configured to access your AKS cluster.The Azure CLI, installed and authenticated:
az loginThe GitHub CLI, installed and authenticated with package and workflow access:
gh auth login --scopes read:packages,write:packages,workflowA GitHub repository with a containerized application. You must own the repository or have write access to it. Fork the repository if necessary.
Sample repositories
You can use your own application or fork one of these open-source samples:
- Docker Example Voting App
- AKS Store Demo
- Example To-do List Application
- Google Cloud Microservices Demo
Step 1: Install the plugin
Open the GitHub Copilot app.
Open the Customize tab in the side menu, and then select Plugins. Search for
radius, and then install the plugin.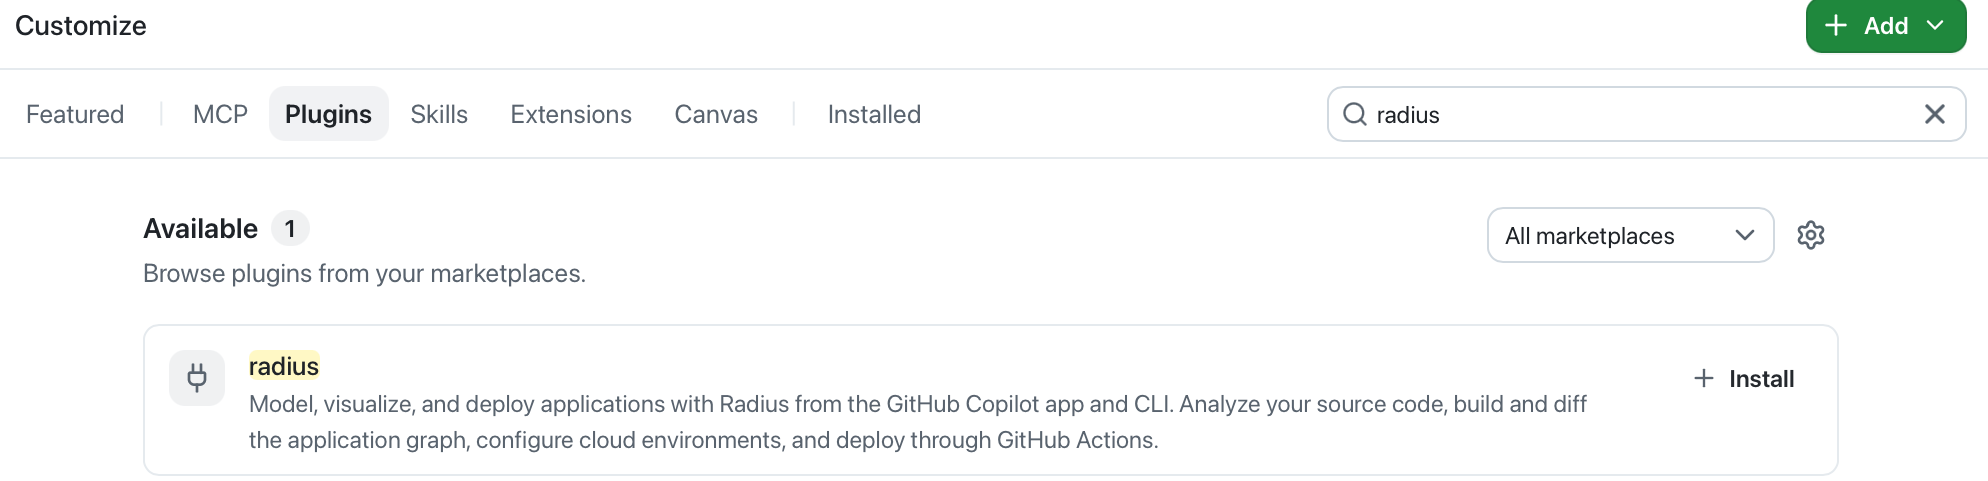
Restart your Copilot session so the skills and Radius Canvas become available.
After installation, use the plugin’s three-dot menu to update or uninstall it.
Step 2: Model your Application
Create a new Copilot session. Select GitHub repository, and then add the repository you want to model.
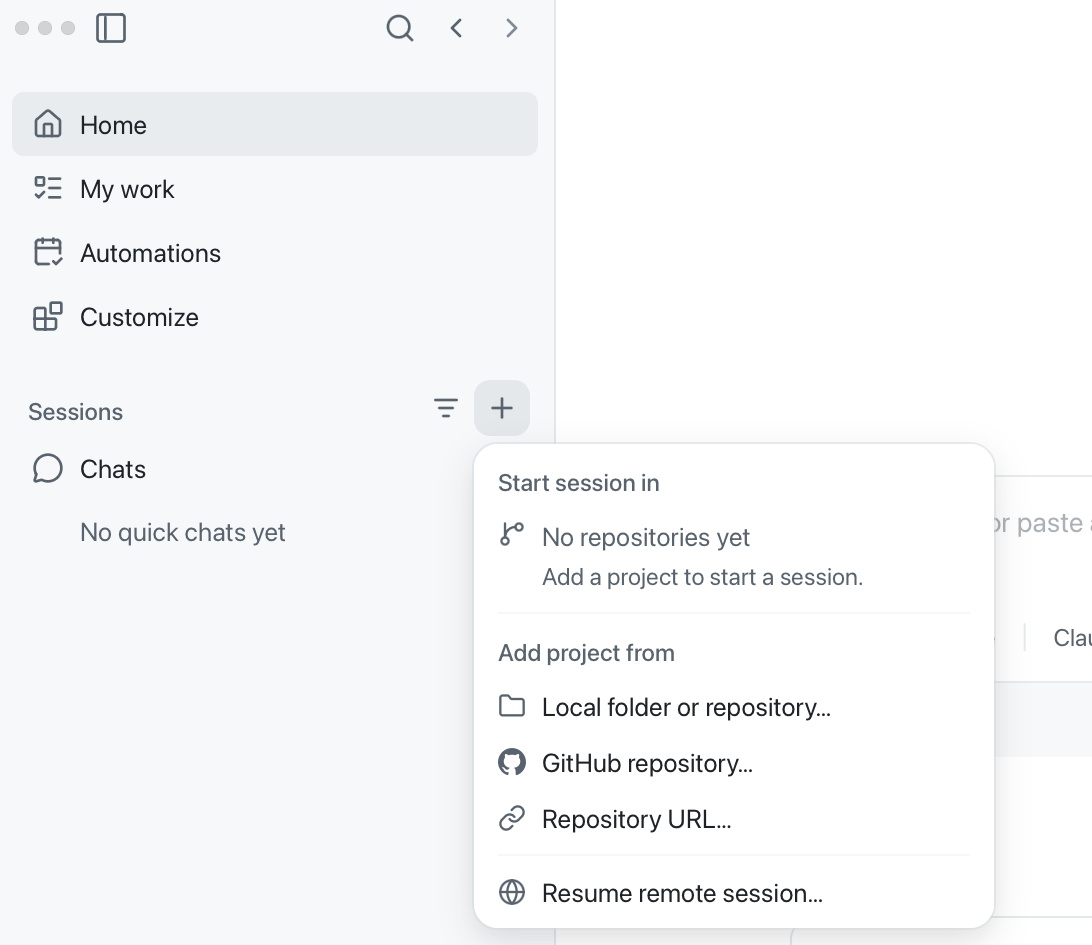
In the Copilot chat, enter:
Show the application graph
Copilot analyzes your source code, manifests, and Dockerfiles, generates an application definition at
.radius/app.bicep, and opens it in the Modeled view of Radius Canvas.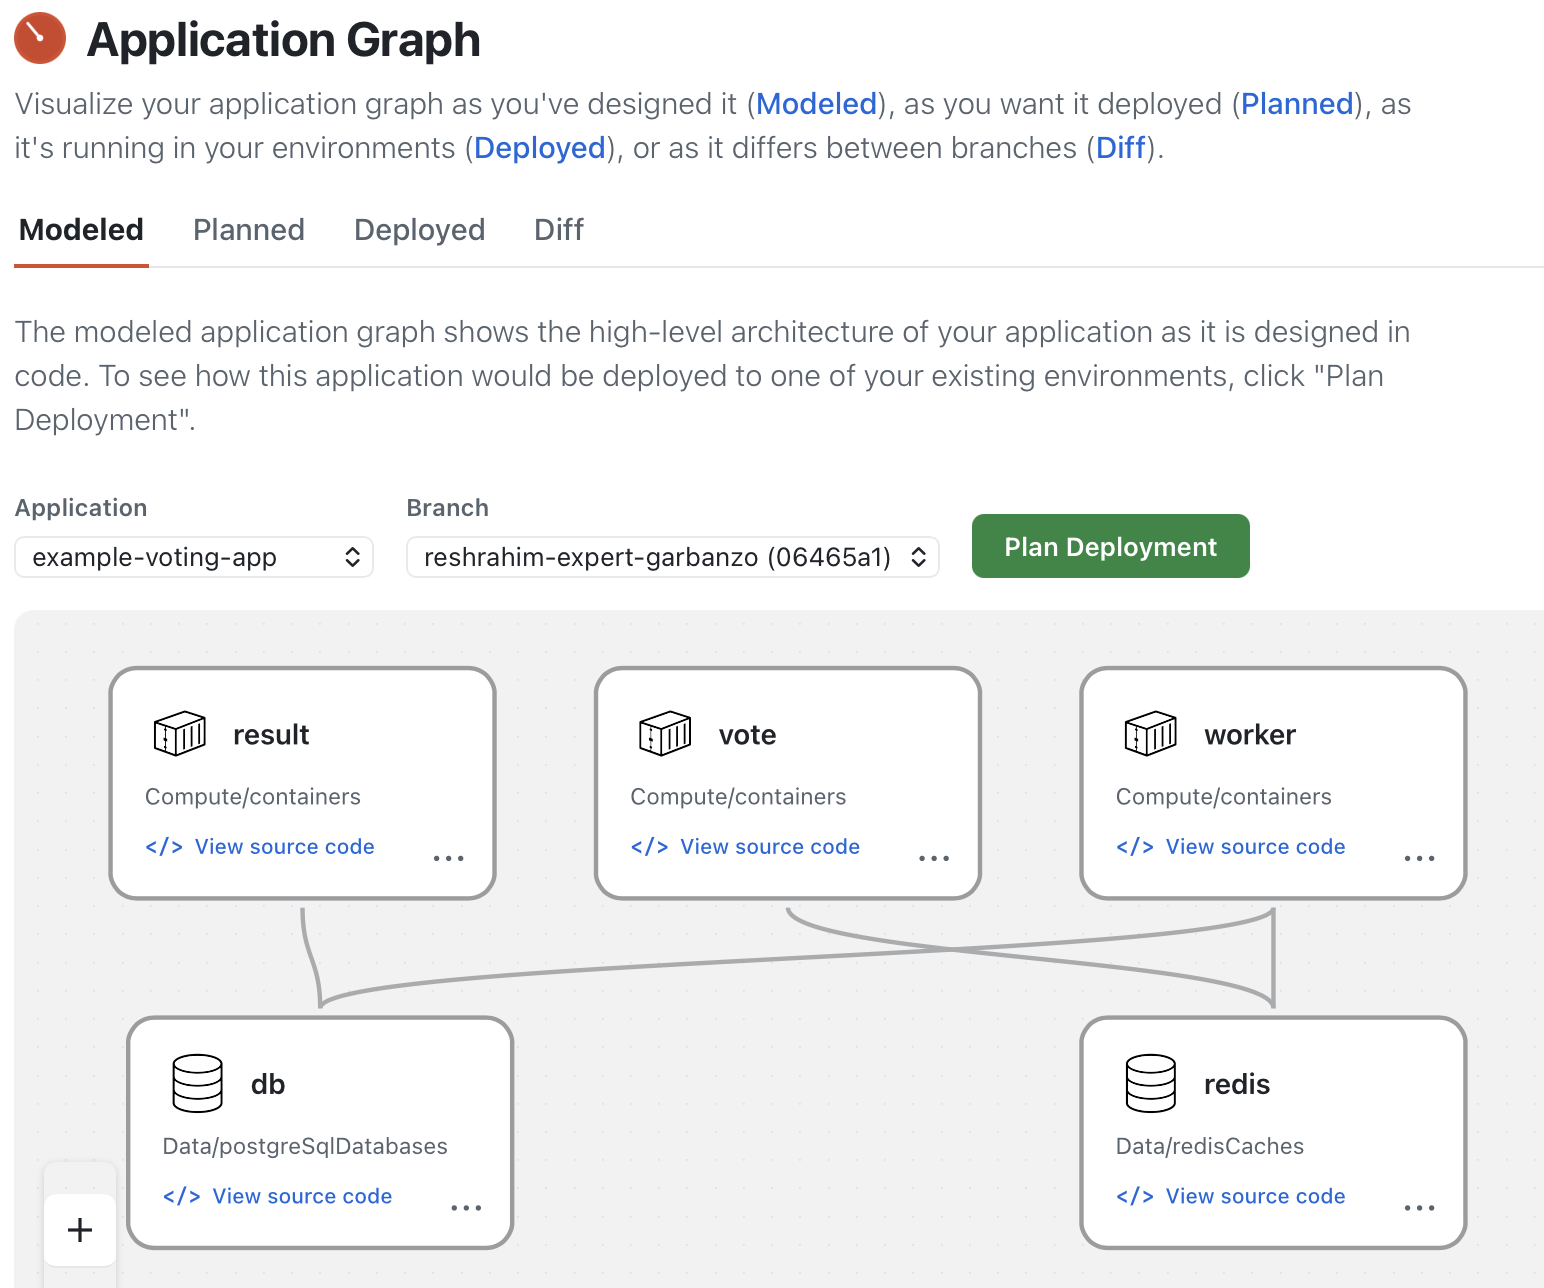
The Application graph represents the workloads, routes, backing services, and connections Radius identified in the repository.
Review the graph to confirm that it includes the expected workloads, backing services, infrastructure dependencies, and connections. Select a resource, and then select View source code to open the source file where Radius detected it.
Select Create Environment next to the Modeled view to begin configuring the Environment and planning the deployment.
Step 3: Configure your Environment
An Environment defines where your Application runs and the infrastructure available to it. After you select Create Environment, Radius Canvas opens the Environment configuration flow.
Under Choose Cloud credentials, open the credential profile dropdown, and then select Create new profile.
A credential profile is a reusable set of Azure tenant and subscription details that Radius uses to authenticate to Azure and configure OIDC trust for GitHub Actions.
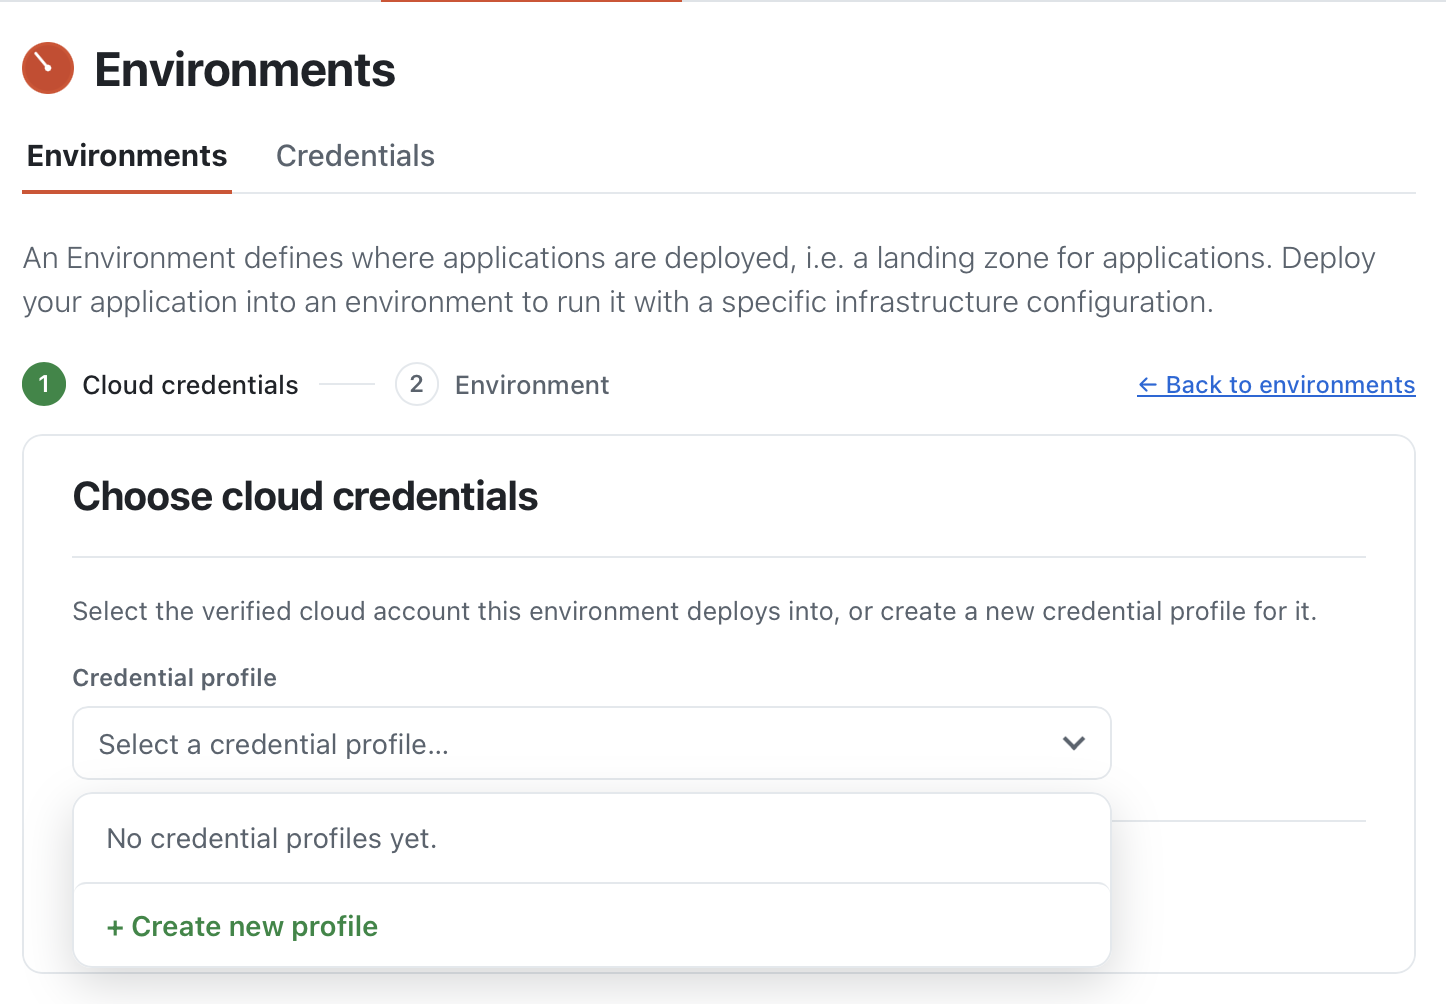
Enter a profile name, select Azure as the provider, and enter your Azure tenant ID and subscription.
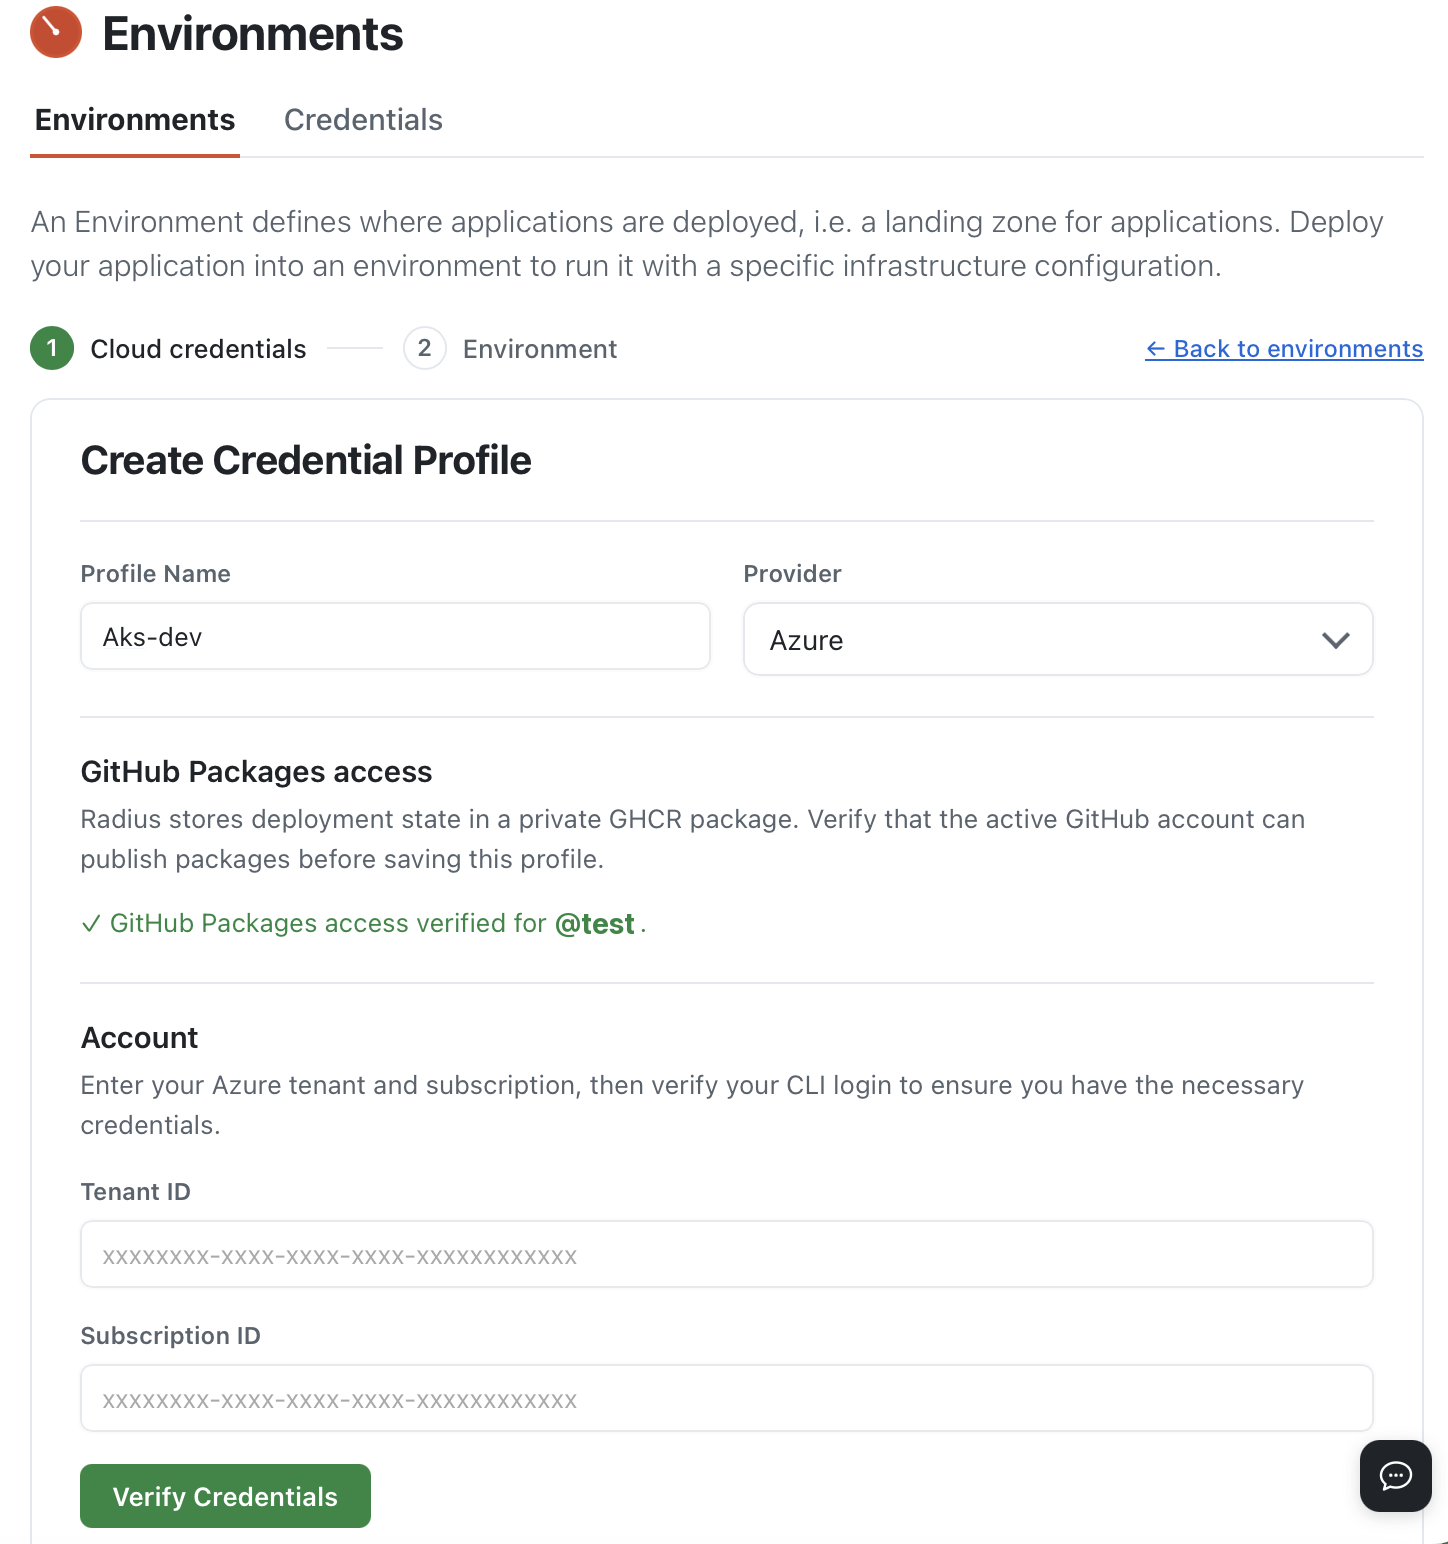
Select Verify credentials.
After verification succeeds, select Save and continue.
Next, enter a name for the Environment and select the GitHub account and the saved credential profile under Connect GitHub to a cloud.
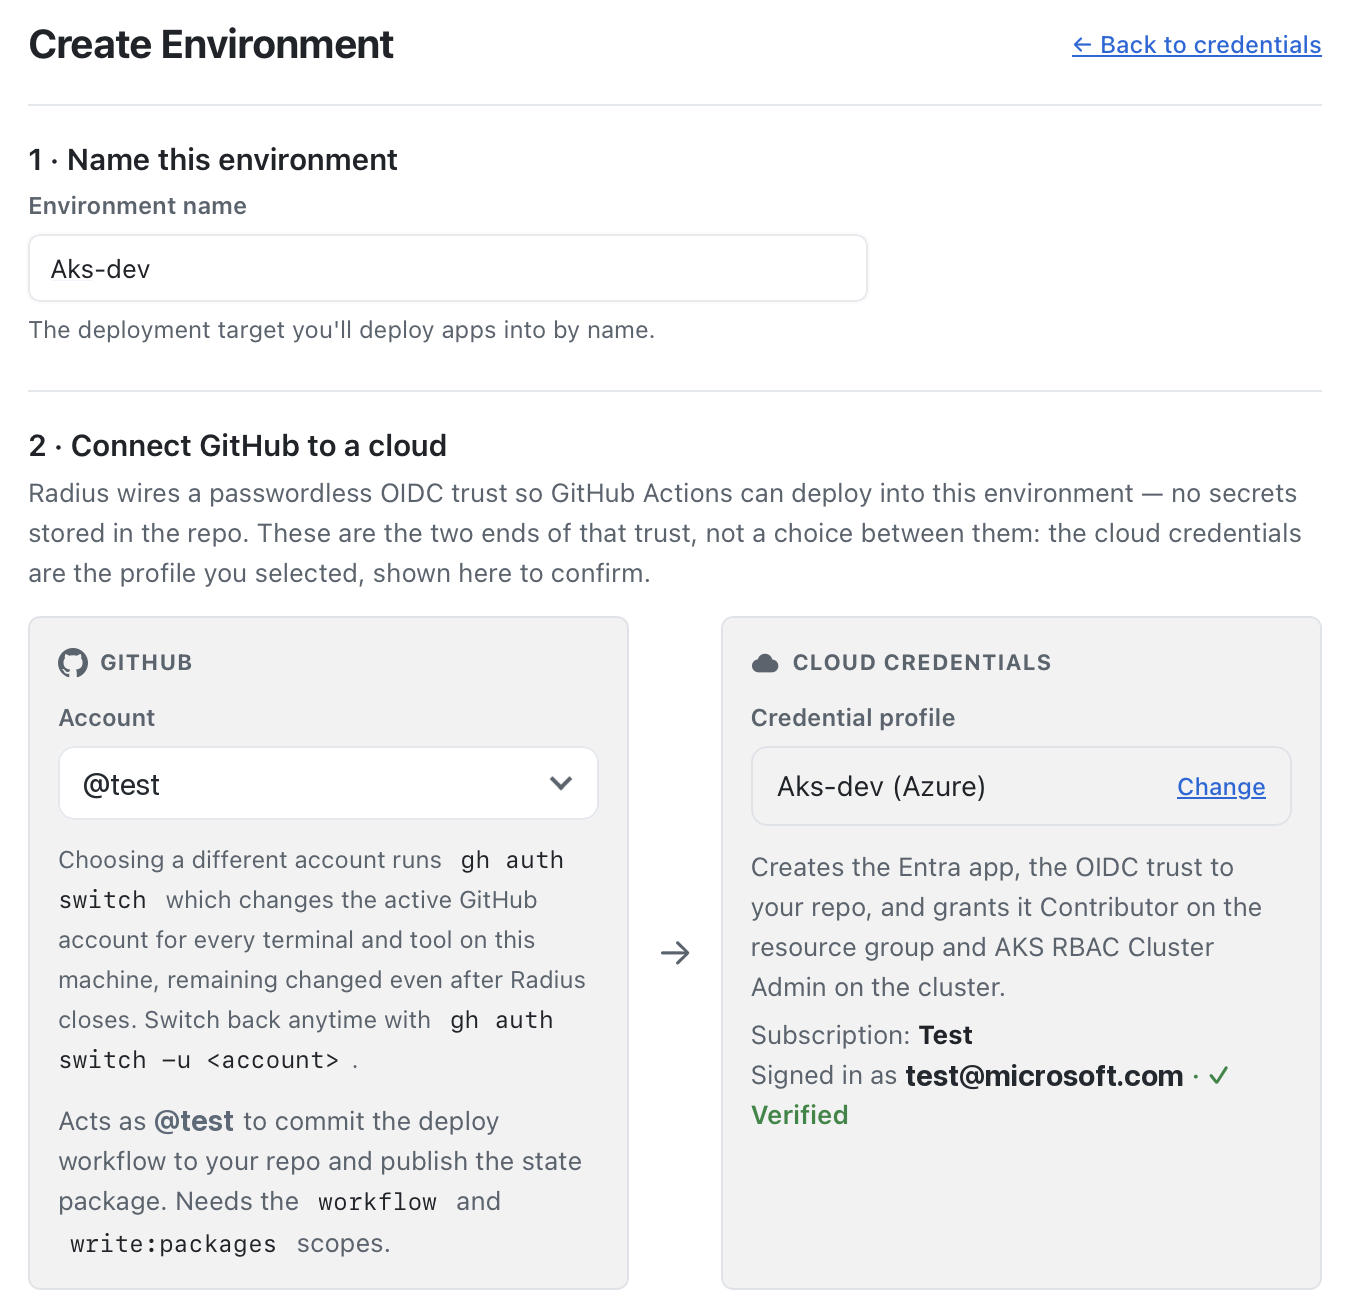
Under Deploy identity, the Microsoft Entra app registration name is already populated.
Under Infrastructure, select the Azure resource group and AKS cluster. Select an existing Kubernetes namespace or enter a namespace such as
my-app.Select Create the Environment. You can follow the status of the Environment configuration.
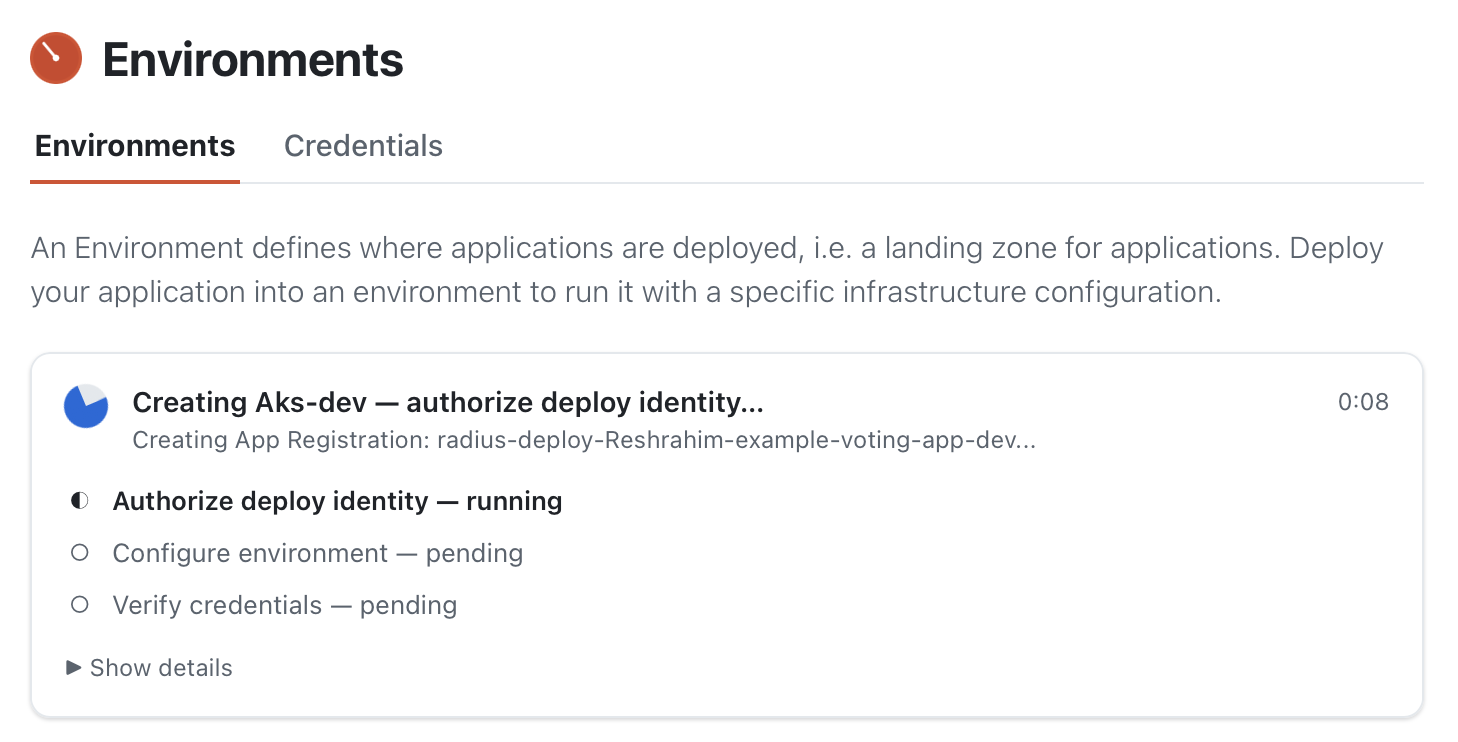
Radius establishes OIDC trust with GitHub Actions, so deployment workflows authenticate with short-lived credentials instead of long-lived secrets stored in the repository.
Step 4: Plan the deployment
When the Environment configuration is complete, Radius Canvas displays Plan deployment, which opens the Planned view.
Confirm that the correct Application, branch, and Environment are selected.
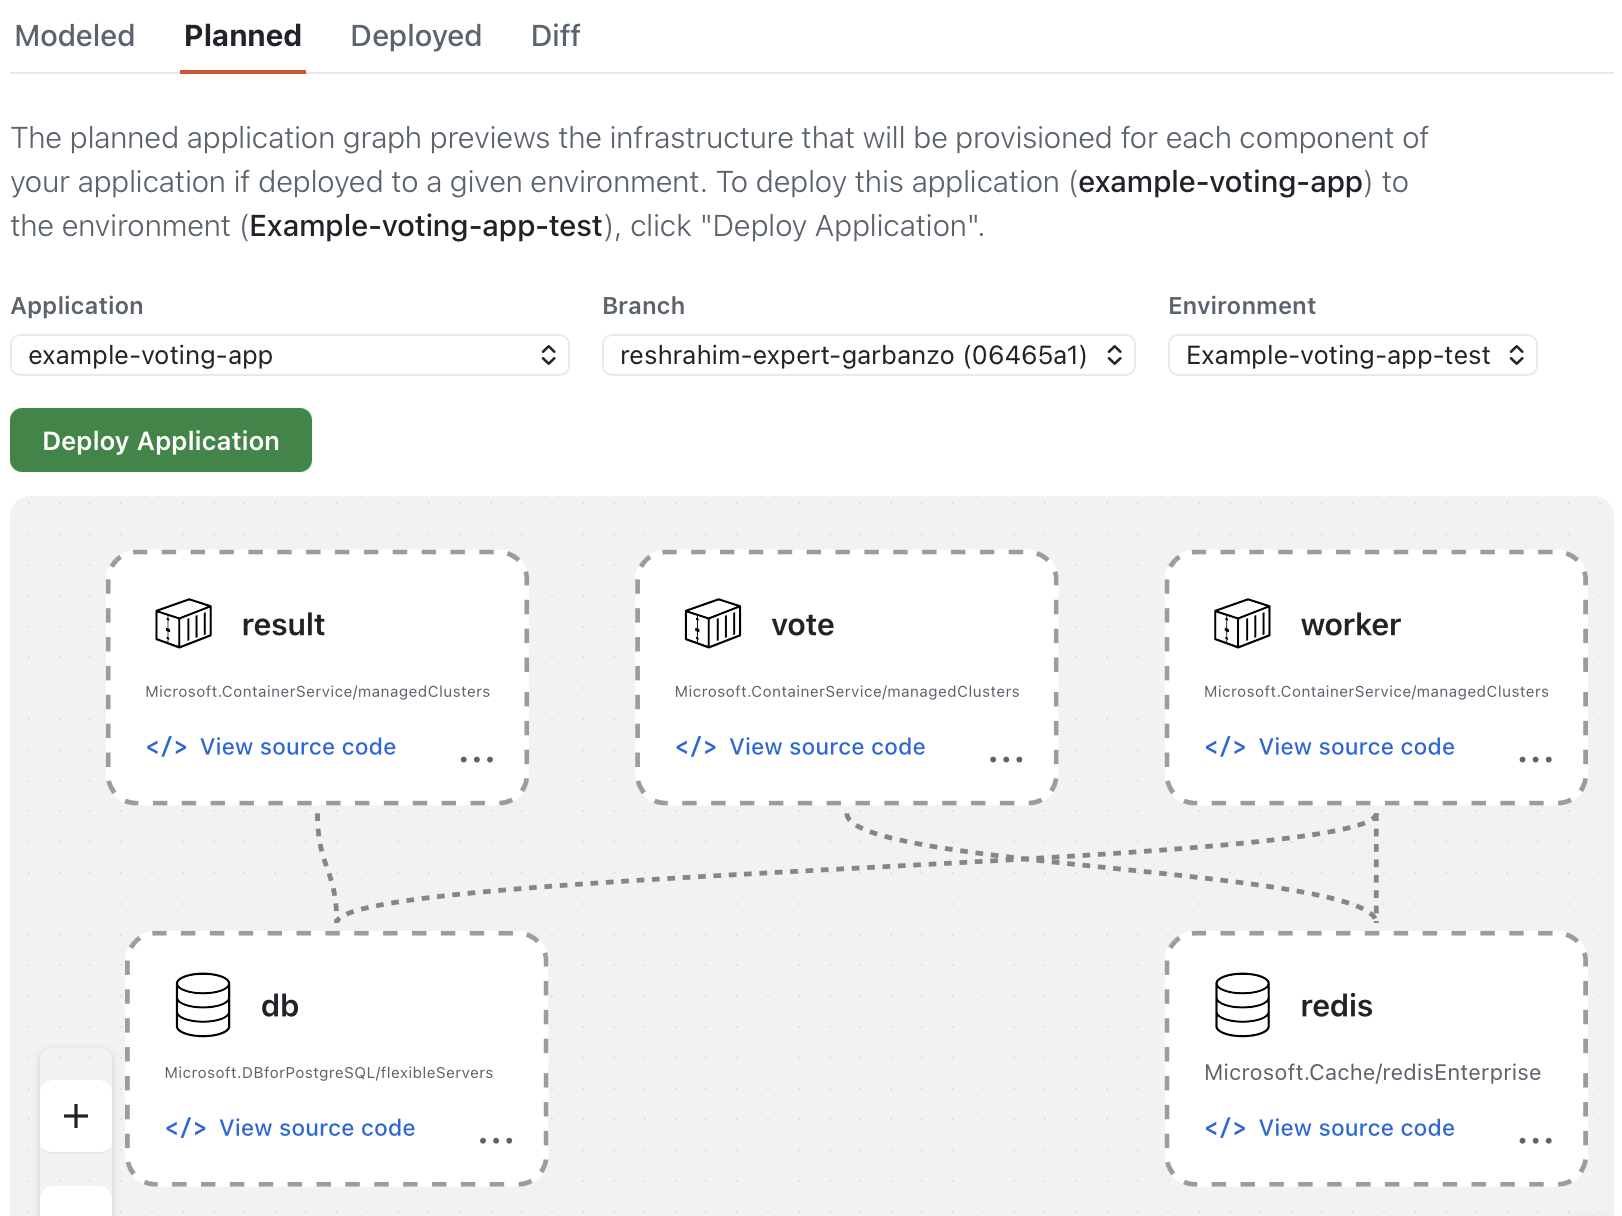
Review the planned Application and supporting infrastructure.
Select a resource to review its Radius resource type, connections, and links to View source code or View app definition.
Reviewing the plan does not deploy or change cloud resources.
Step 5: Deploy your Application
In the Planned view, select Deploy Application.
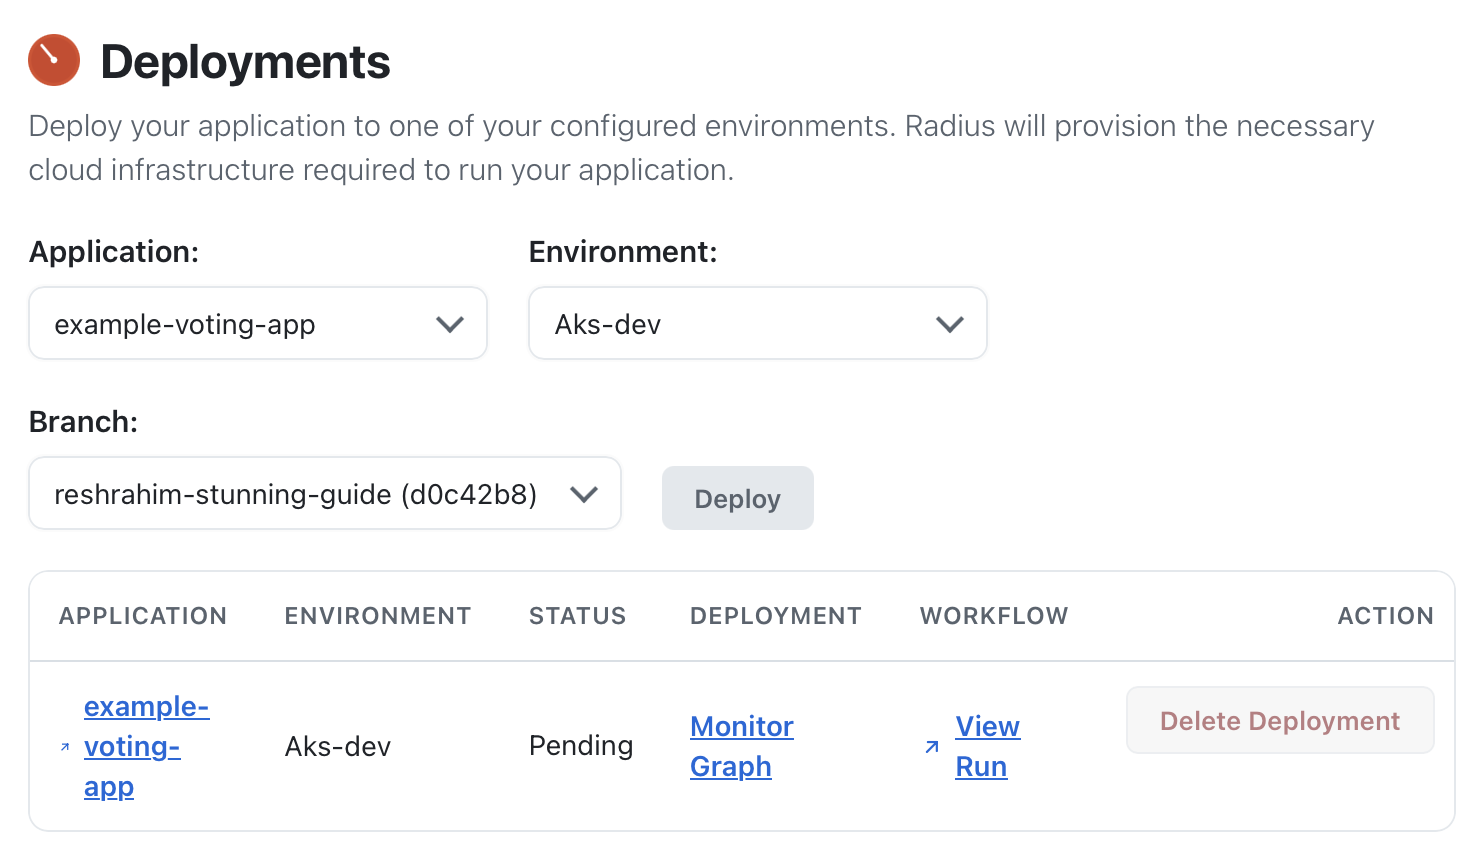
Radius Canvas opens the Deployments view and dispatches a GitHub Actions workflow that provisions the required infrastructure and deploys the Application to the selected Environment. Monitor progress in the view, or open the workflow run for details.
The workflow is committed to your repository, so you can review it before it runs and maintain it alongside your application code.
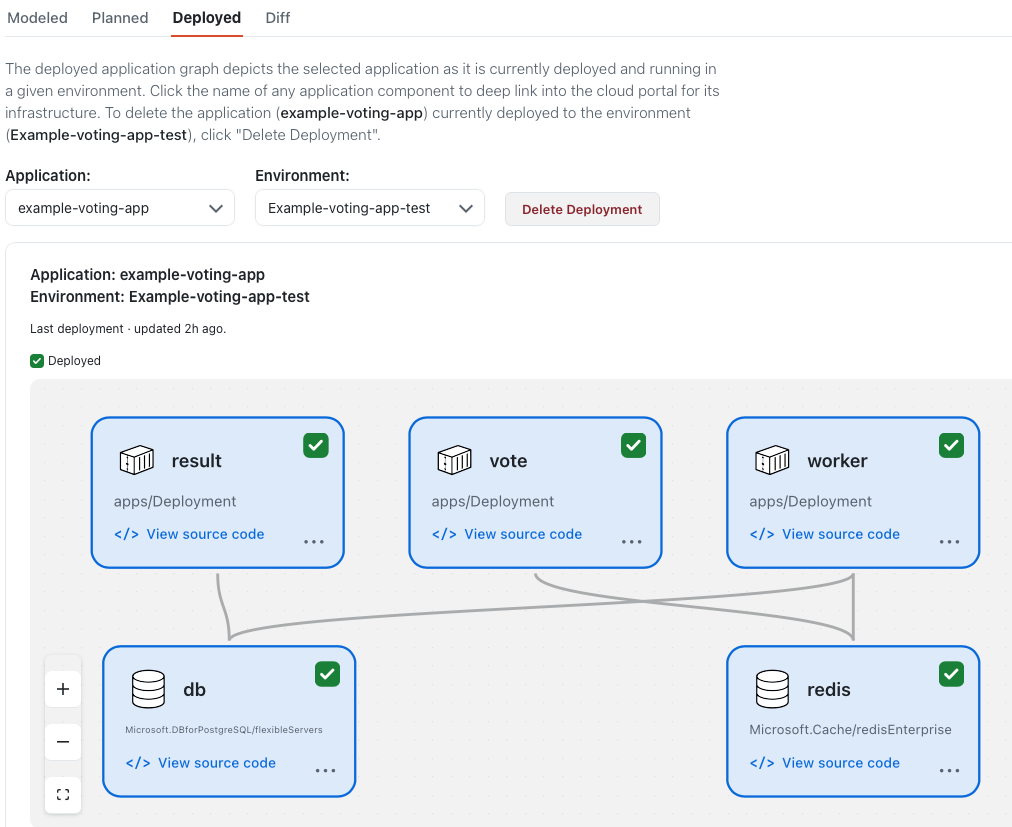
When the deployment completes, return to the Application graph and open the Deployed view to see the Application and its resources running in the Environment.
Step 6: Access your Application
In the Copilot chat, enter:
Access my deployed application
Copilot sets up port forwarding and provides a URL. Open the URL to access the deployed Application.
Step 7: Compare Application changes
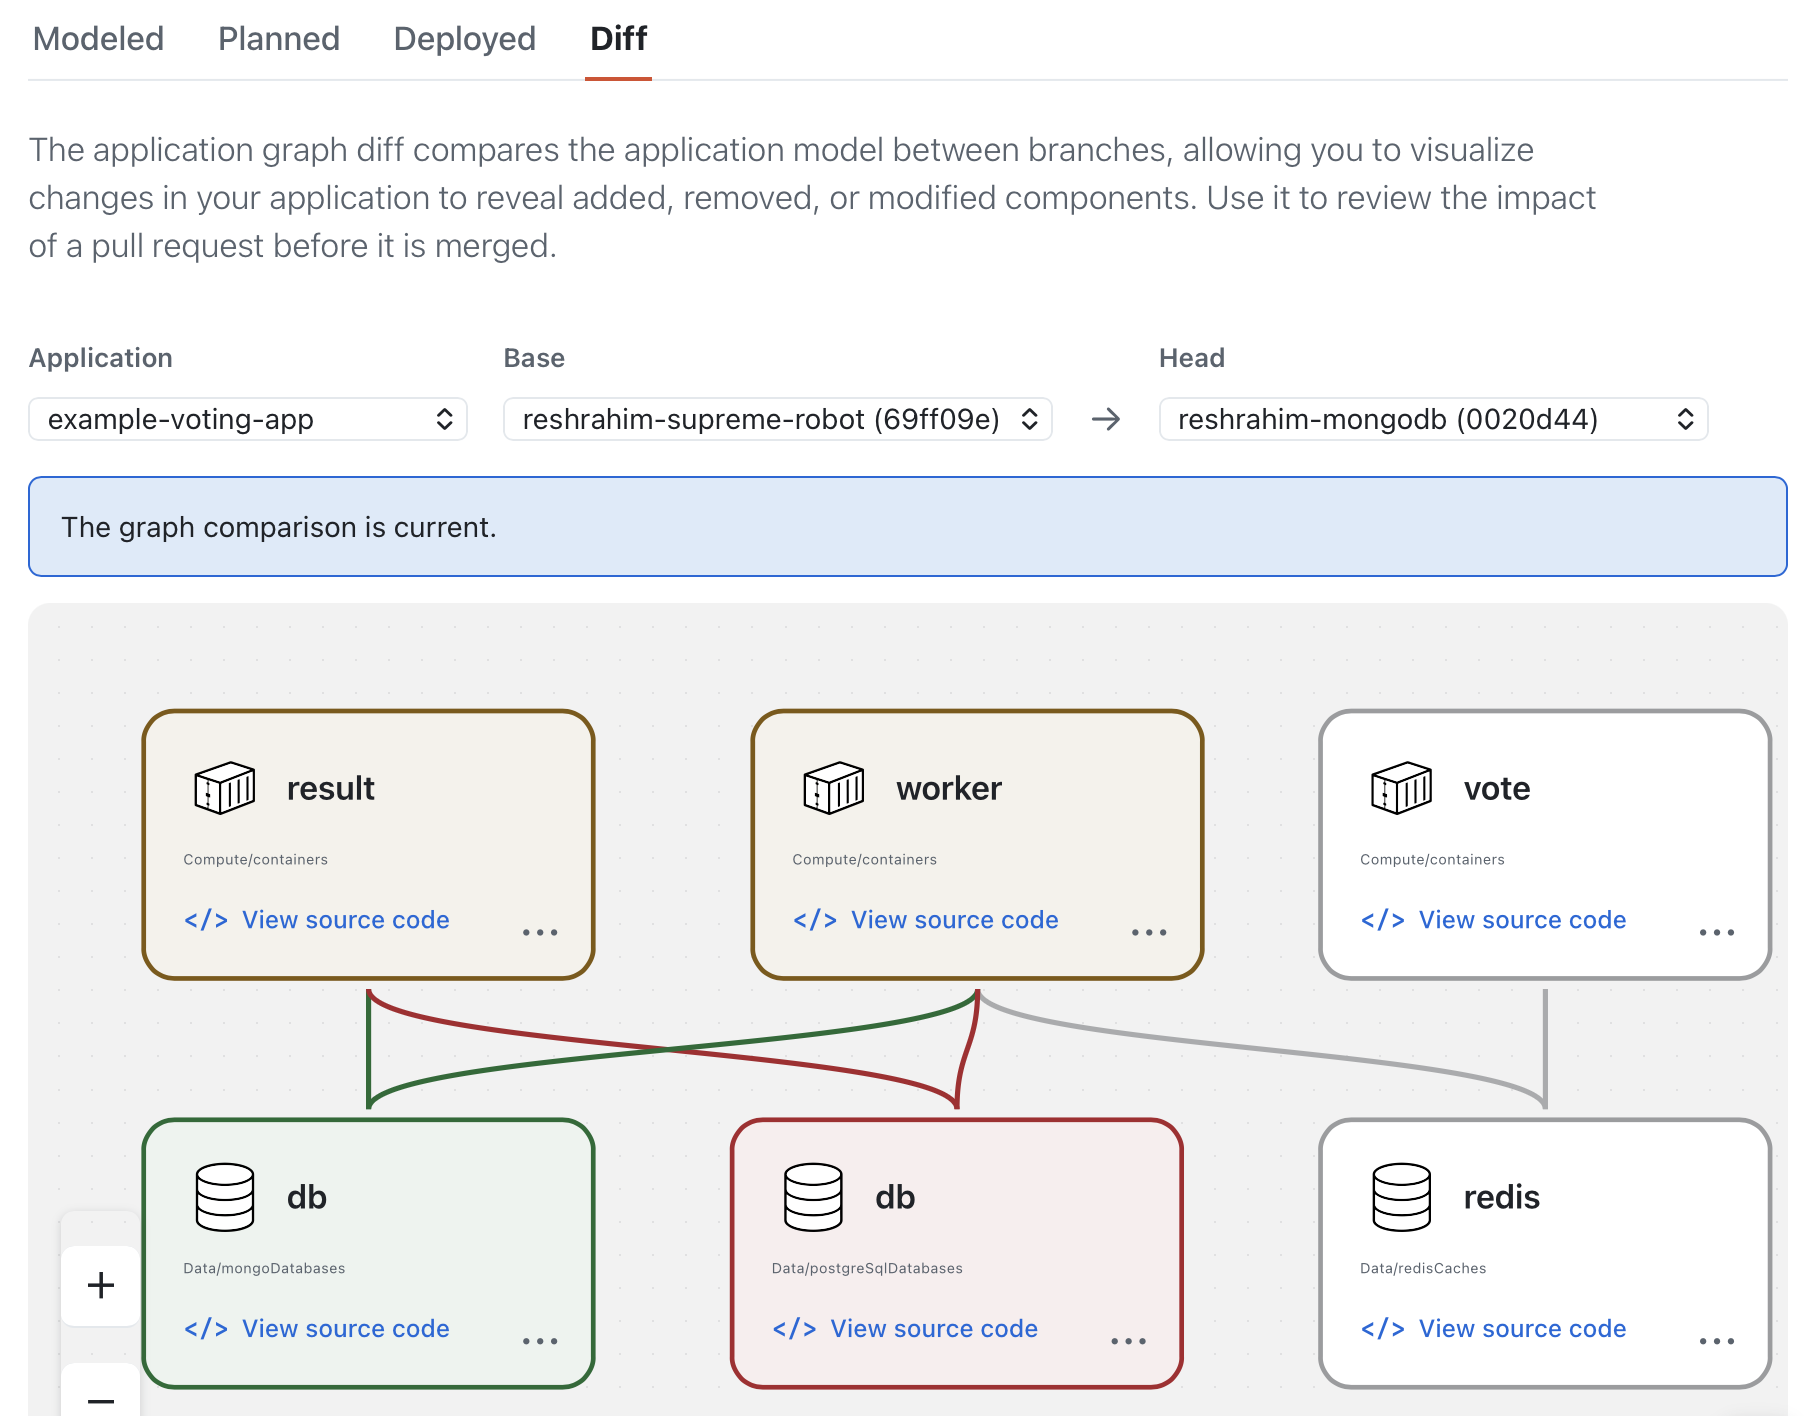
Make changes to your Application on a branch, and then open the Diff view to compare the updated Application against main.
- Select your Application.
- Select
mainas the Base branch. - Select the branch containing your changes as the Head branch.
- Review which components, connections, and dependencies your changes add, remove, or modify.
You can generate a Markdown summary of the Diff view and post it as part of a pull request comment, so reviewers can see the architectural impact alongside the code.
Step 8: Clean up
- In the Deployments view, select Delete Deployment, and then confirm the deletion.
- Monitor the deletion workflow until it completes. Radius deletes the Application and the infrastructure resources owned by it.
- If you no longer need the Radius Environment, open the Environments view and delete it.
Deleting a deployment can permanently remove infrastructure and data owned by the Application. It does not delete the AKS cluster or Azure resource group.
Troubleshooting
- Radius Canvas does not open. Ask Copilot to
Fix my Radius Canvas. This invokes the Radius repair skill, which copies the required Radius Canvas files into place. - Modeling cannot find a Dockerfile. Radius Canvas currently supports only applications with a Dockerfile. Ask Copilot to
Create a Dockerfile for my application, and then model the Application again. ghis not recognized orcommand not found: gh. Install the GitHub CLI and restart your terminal, then rungh auth login.- The active GitHub account is missing the
read:packagesorwrite:packagesscope. Run the authentication command shown by Radius Canvas, and then retry. IfGH_TOKENcontrols authentication, use a token that includes both scopes. Timed out waiting for credential verification to complete. If the repository’s default branch is protected, Environment setup might have created a pull request for the Radius workflow files. Open and merge that pull request, then retry verification.Branch not pushed yetorExtension "radius" is not recognized. Commit and push the complete generated.radiusdirectory, includingbicepconfig.json, to the branch you are deploying, and then deploy again.- An image build fails with
exec format error. Ask Copilot to review the Dockerfile’s target-platform handling and update the application definition with supported build platforms, and then deploy again. - A removed resource remains after redeployment. Radius re-deployments are incremental and do not automatically delete resources removed from the application definition. If the resource is no longer needed, delete it in the Azure portal.
Report bugs and feedback
Before opening an issue, check the existing Radius AI extensions backlog for a matching report.
Submit bugs and feedback with the feedback or bug report form. You can also open the form from the feedback button in the bottom-right corner of Radius Canvas.
Feedback
Was this page helpful?
Glad to hear it! Please feel free to star our repo and join our Discord server to stay up to date with the project.
Sorry to hear that. If you would like to also contribute a suggestion visit and tell us how we can improve.